

Teseo Naxos is a shoe designing software made by Teseo Italy. Here in the same platform, we can make digitizing, pattern making, grading, plotting, 3d Visualization, costing and product specification sheet. Here in this Naxos tutorial, we will discuss the process of Grading. The digitization part and the Patternmaking part have already been discussed in the previous tutorials. Other parts will be discussed in follow on tutorials. We also discussed the process to modify digitizing entities.
Before going to the details we need to know how to set the size of the model pattern or digitized pattern.
How to set the basic size to a Project:
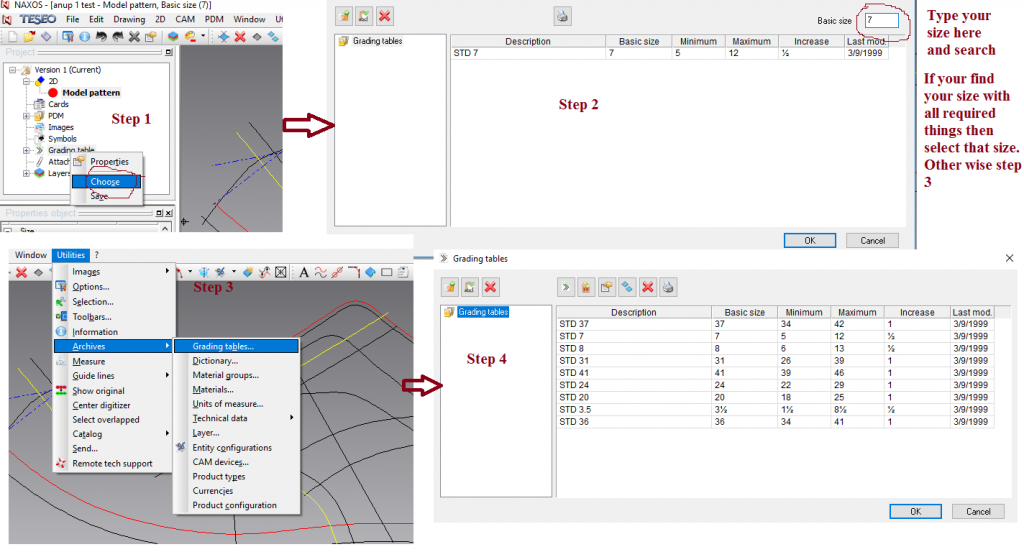
- On the “Project” manager select the Grading table with the menu key and select Choose. See Pic 1
- From the “Grading Table” window, type the Basic size in the box at the bottom right and click “OK” to confirm.
- The selected size is displayed in the headline toolbar. Then choose ur size.
- In case the Grading Table Archive contains no grading tables with the required basic size the window appears empty, and to assign a size to the project it is necessary to create a grading table using the key New in utilities> archive> grading table> new or modifying an existing grading table.
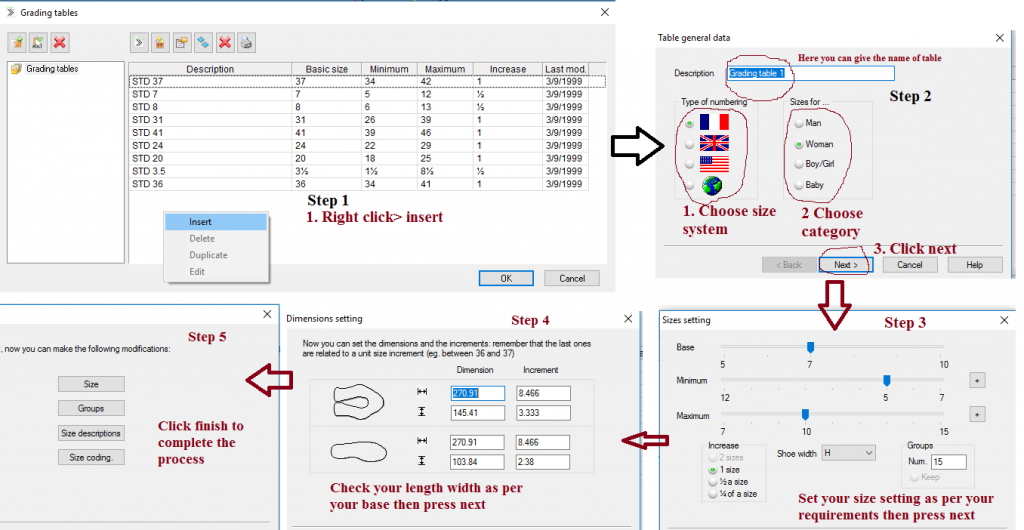
If you want to create a new size table the follow the procedure given in pic 2.
- Then on the “Project” manager select the Grading table with the menu key and select Choose. See Pic 1
- From the “Grading Table” window, type the Basic size in the box at the bottom right and click “OK” to confirm.
- The selected size is displayed in the headline toolbar. Then choose ur size.
So we can say grading in sizes is a procedure allowing us to generate the pieces of the model in all the required sizes according to the parameters set up in the grading table. And the grading table is required to set up the parameters necessary to grade the project in sizes. The tables are saved in the database so, if it is shared on the network, Grading Table Archive will be automatically available for all the users logged in the same network.
How to grade the whole Base:

- On the “Project” manager right click on the model and select Grading. See Pic 3.
- The progress of the grading is displayed on the bottom status toolbar.
- When the operation is complete the grade symbol appears next to each piece. See Pic 3.
- To check if the grading is correct, select the required object and click the icon Align Grading. Then click the aligning point. This function is recommended to check if the restrictions have been correctly applied.
How to grade a piece
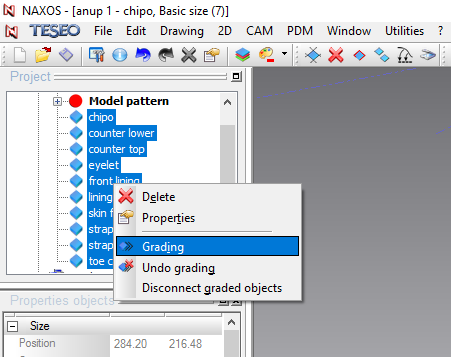
On the “Project” manager select the required piece (hold down the Ctrl key to select more pieces simultaneously), click the menu key and select Grading or right click on it and select grading. See Pic 4. The rest procedure will be the same as model/base grading. In this way, only the selected pieces will be graded as well as the Model Pattern since the two objects are parametric each other.
Notes
If errors occur during the operation a warning message appears in the “Messages” dialog box from which it is possible to understand the problem and the piece or sizes in which it has occurred. Then it will not be possible to save the model until the error is solved. So, see the error message and solve it. And then continue the process.
How to undo grading of a piece/Base:
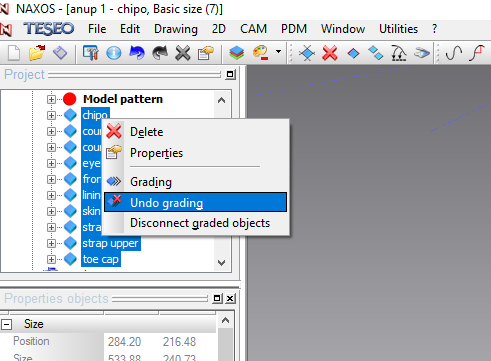
If you find any error in grading, you can undo the grading. The process is given in Pic. 5. On the “Project” manager select the required piece, click the menu key and select ‘Undo grading’.
There needs some restrictions where grading is not allowed, like in logo or in strap width. So, in those cases, we first restrict those areas before grading. The restriction process will be discussed in upcoming tutorials.
Reference: Teseo Naxos lessons .. TESEO spa 2011
Please share your feedback and suggestions. In case if you have any queries about any topic of Footwear and Leather Goods, post it in the comment section. And if you like this topic you may share it on facebook, twitter or any social site. Thank you
Hi,im iranian,i used your softwear,i need hepp,please